Jason Truesdell : Pursuing My Passions
A life in flux. Soon to be immigrant to Japan. Recently migrated this blog from another platform after many years of neglect (about March 6, 2017). Sorry for the styling and functionality potholes; I am working on cleaning things up and making it usable again.

Pope’s beans and purple mashed potatoes

March 31, 2010, 11:16 PM

These Peruvian beans, called fagioli del papa in Italian, have a robust flavor and a dramatic color. This was just a quick-and-dirty weeknight preparation, so I don’t even remember exactly how I seasoned it, but I know I used za’atar, onions, garlic, and a mix of bell peppers, along with a touch of tomato. I boiled the beans themselves with a few allspice berries and bay leaves, just enough to make the beans a bit more mysterious but not so much as to compete with the final seasoning.

Fagioli del papa, Pope's beans

Anyway, we liked the results, even with fairly odd combination of ingredients.

I rescued a few lonely purple potatoes that had been sitting neglected, almost forgotten, in a brown paper bag. After boiling them, I pressed them through a potato ricer, and brought them back to my smallest sauce pan to cook them with a little butter and salt. I stirred in milk gradually, then I finished them off with an unhealthy dose of medium-aged gouda.

Purple potatoes pureed on the stove

I don’t know how to make mashed potatoes look interesting, but this version was fun, and like with any other version, butter does most of the work. Milk softens the color quite a bit, so the result leaned a bit lavender.

Purple potatoes pureed with butter, milk and 1-year-aged gouda

The puree, while not especially pretty, was surprisingly smooth. I usually don’t stir mashed potatoes much after ricing them, for fear of turning them into glue, but I must have gotten the temperature just right, because they were almost impossibly creamy. Despite the suggestion of the little pat of butter on top used to finish them, I used only a couple of tablespoons of butter in the puree itself, for about a half pound of potatoes. Good and simple.

Technorati Tags: ,
Tagged

Gobodoki in roasted gobo soup

March 30, 2010, 10:03 PM

Ganmodoki, a deep-fried tofu dumpling, are kind of a staple of Kyoto-style tofu cuisine, and find their way into nimono, among other things. I’ve made them before, but this time, I took a slightly different route.

Roasted gobo soup with burdock ganmodoki


Inspired by a crazy cheap deal on burdock root at Rising Sun Produce in Seattle’s International District, I decided to emulate a soup Hiromi and I tried years ago at Del Cook, a French restaurant in a rural extension of Osaka in the Nose valley, made with Japanese burdock root, called gobo.

I took bunch of burdock roots and roasted them in the oven with a bit of salt until the burdock softened up a bit, probably around 20-30 minutes. Then I broke out the blender and busted up the roasted roots with some milk and vegetable soup stock. The process took a bit longer than I would have liked, but even after all that pureeing, I discovered that the texture of the mixture was far chewier than I’d want in bisque-like soup. At first, in denial, I tried pressing on, seasoning the liquid with salt and some “Balinese Seasoning” that I first discovered at World Spice Merchants a few months ago, cooked in a bit of butter. But I realized chewy wasn’t going to work for this, and I needed to find some workaround.

So I pushed the liquid through a sieve, extracting as much as I could manage. I realized I had a lot of burdock fiber that might still be put to good use. If we eat all this roughage in kimpira-gobo, there must be some way to make it edible, right? That’s when ganmodoki came to mind. I got myself a block of momen-doufu, medium-firm tofu, broke it up, and mixed it with the solids from my sieving efforts, along with black and white sesame seeds. The ratio was probably about 1:1 burdock fiber and tofu, without considering the seasonings. Even before I fried them, the mixture tasted pretty nice, so I had some confidence that things would work out. The chewy texture that had caused me consternation in the soup was nicely mitigated by the custardy texture of the tofu, and in a solid form, whatever fiber in the texture remained was far less disconcerting.

Roasted gobo soup with burdock ganmodoki

Using a couple of spoons, I made small balls out of the solids and placed them into the deep fryer.

I was surprised at how deeply the ganmodoki browned. There’s a touch of sugar in the spice blend I used, and probably a reasonable amount of sugar in burdock root itself, but I have never had this kind of result when making more conventional ganmodoki. Even deeply browned, the little balls were pretty tender inside, and just barely held together.

I modified the soup from my original plan, incorporating some pureed cannelini for protein, so in many ways, save for my use of burdock root in place of the cheddar in the version of the soup that was recently featured in Seattle’s Japanese newspaper, Soy Source, it was not a huge departure from that. The roasted burdock totally transforms the flavor from rich to earthy, so they’re certainly not identical. Certainly, the little tweaks are proof that you can make very small changes to a dish and turn it into something nearly unrecognizable. The white beans contributed protein and some iron to a dish that would otherwise best serve as a small side dish, making it a more substantial part of dinner.

To serve, I ladled the liquid into onion soup bowls, and placed three pieces of the “gobodoki” (half gobo, half ganmodoki) on top. I was convinced Hiromi would groan at my bad Japanese wordplay when I unabashedly mashed two unrelated words together, but she embraced the name unreservedly.

To finish, I topped the soup with deep-fried, salt-sprinkled burdock root. We served it with some gnocchi alla romana, which I’ll try to feature in a future post. A little bread and a nice green vegetable side dish would make a nice alternative.

I really like the Balinese seasoning spice mixture that in my cream-style soups. I have no idea if it even resembles anything actually used in Indonesia, but that’s beside the point; the dishes I’ve made with it so far simply aren’t indigenous to any particular country, so I feel free to do whatever tastes good. I dig the shallot, lemongrass and peanut base notes that it provides in anything creamy. There’s a little cinnamon, white pepper, and chili in there, and a hint of dried ginger, so it adds a little magic to anything it touches.

It’s spring, so it must be time for warabi

March 29, 2010, 9:00 AM

The last couple of weekends we’ve been taking advantage of the fiddlehead fern fronds found at Sosio’s. Go get them before they disappear for the rest of the year!

Fiddlehead fern fronds, aka warabi

We’ve been preparing them using our usual nimono-style treatment… Blanch briefly in a boiling solution of water and baking soda to remove aku, or bitterness, shock in ice water, then gently poach in dashi (or really, any soup stock), soy sauce, sake, a little mirin, and, if needed, additional salt and sugar.

Maybe I’ll do them another way before the season ends, but somehow this simple version pleases me the most.

I’ve written about them before, but the easiest flavor comparison to make is to white asparagus. They’re slightly bitter, as you’d expect from white asparagus, and some of the sweetness and you’d expect from asparagus, but they have a bit more of a foresty aroma.

They usually only have a 4-8 week run, depending on factors that I don’t yet know how to predict. I think they’ve come in a bit early this year, as I’ve gradually been trained to expect them sometime in April. But if morels can be early, so can warabi. In any event, if you want to give them a try, get them while you can.

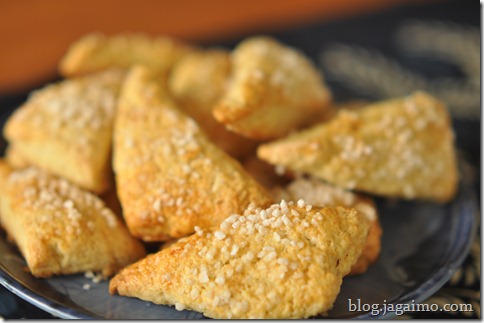
Orange scones with blood orange jam

March 28, 2010, 9:43 PM

For years, I was impressed more by the idea of scones than the reality of scones. It’s mostly because I made the mistake of buying them at coffee shops, where they cost about $3 and generally taste stale and tough and excessively sweet. They typically rather unimpressively attempt to make up for their inadequacies,  especially the fact that they aren’t served with good butter and jam, by replacing all of the textural greatness of a fresh scone with sugar.

Orange scones

Freshly-baked scones are an entirely different animal. They’re aromatic, crisp yet tender, and need very little sugar of their own if served with a little butter and jam. The best thing is that they need so little effort to prepare. The dough comes together in two or three minutes, and they take just 20-25 minutes to bake. It’s easier than pie.

 A closer look, orange scones

This morning, we woke up late and hungry. I was almost tempted to make a trip to a bakery, but then I realized I would have to shower and shave before I was fully awake, and that would make Sunday morning seem far too much like a normal workday for anyone’s good. To arrange for fresh scones, I just needed to stumble into the kitchen, preheat the oven, and pull together a few simple ingredients.

 Orange scones, Harbor Island grapefruit, blood orange jam

I follow a simple ratio to get decent scones no matter what I put into them: 1 stick of butter, 1.5 cups of flour, about a teaspoon of baking powder, 1 egg, and a little bit of milk, yogurt, cream, or sometimes sour cream. I almost always add a bit of salt, and for sweet scones, I add probably no more than 3 tablespoons sugar. Today, I had a nice orange in the refrigerator, so I grated about a teaspoon’s worth of zest to flavor the scones. A little vanilla would be nice, too.

The dry ingredients just need to be sifted together and the butter cut in gently. When I get this far, I make a well in the middle, and I add the egg and a splash of milk. I stir the liquid in the well and gently fold the ingredients until the mass comes together.

One scone, slightly eaten, with blood orange jam

Then I just roll out the scones to an even thickness, cut them into small triangles, and bake them. To make them a little prettier, I brush them with a little egg wash and sprinkle on pearled sugar, but that’s totally optional.

The scones just need to be baked at around 375F until they look nice and gently browned, usually about 20-25 minutes.

They’re buttery enough when fresh out of the oven that we usually don’t do more than eat them with some nice jam unless we’ve got some truly spectacular butter or some Devon cream around. Today, we cracked open a blood orange gelée-style jam that we found in a little tea shop in Hannover, Germany over the New Year holiday. This jam, which is flavored with a little Cointreau, had a nice complexity and I may steal the idea if I ever take up canning.

The moral of the story: Don’t settle for bad scones. Just make them yourself, and they’ll be miles above the quality of nearly anything you can buy.

Technorati Tags: ,,
Tagged

Satsumaimo soufflé

March 27, 2010, 12:27 AM

So I’ve had this dangerous affinity for meringues in the last year or so. I like them on cakes and pies, I like them on savory dishes, and I sometimes like them all by themselves.

This occasionally results in something approaching culinary genius, but more often than not, something goes slightly wrong. The most common problem is usually my piping effort. My technical mastery of piping can, more often than not, be fairly compared to the artistry of a six year old. Occasionally I just over-bake them by a few minutes and they come out far too dark.

Sweet potato souffle in situ

This one decided to explode.

You may not see it here, because I tried to find the best possible angle, but my meringue mostly deflated before it ever finished baking. It spread out more than it puffed up.

In fact, it’s technically more of a soufflé than a meringue. What I did was roast a Japanese sweet potato, slice it in half lengthwise, and scoop out a good amount of flesh, which I mashed. Then I mixed the mashed flesh with egg yolk while the flesh was still warm. Separately, I beat egg whites into a meringue, adding a small amount of sugar and a heavy pinch of salt. Then I gently folded the sweet potatoes back into the meringue, and filled the scooped out part of the potato with the mixture. To finish it off, I piped a bit more of the mixture on top with a star tip, and sprinkled black sesame seeds on top. I then baked the dish at about 375F until it was nicely browned.

I think I used a bit too much egg white. But the result, even if a bit ugly and quite technically flawed, tasted pretty nice. I added enough salt to the mixture to make this a savory side dish rather than a dessert, but you could certainly adjust the preparation to make it work either way.

Done right, it could look quite elegant, but I’m almost happy with my admittedly rustic results. It’s a little wafuu without being something you’d typically find in most Japanese mothers’ repertoires, and compatible with both Japanese and American taste sensibilities.

Next time, I want to make some adjustments to improve the stability of the foam. But it’ll go on one of my menus again.

Famous for 15 minutes again

March 25, 2010, 11:03 PM

I’ve had a few brushes with fleeting, mostly inconsequential fame.

My very first letter to the editor was published when I was about 14 years old in Knoxville, Tennessee. Something that was ostensibly my own writing, heavily edited, was first “published” in a computer magazine when I was about 15 years old, for which I received about $50. During college I was quoted in the West Coast edition of USA Today because I said some silly but, well, quotable thing about the 1992 Vice Presidential debates in the Media Fellows lounge at my university, which happened to be Dan Quayle’s Alma Mater. I had a few decent articles and some not so great ones published in my college newspaper and in a Seattle Asian American newspaper. Once I was even featured in a Japanese newspaper in Japan for dressing up as Santa Claus at a friend’s family’s nursery school. And, of course, when I started my business, a few local papers published an article or two about my project.Jason in "otoko no ryouri"

Photo source: Soy Source, shot by Hiro Yamada. I’m on the right side.

But I’ve never been featured in a newspaper just for doing the most ordinary of things… making a nice lunch.

This week Hiromi and I were in a local Japanese newspaper called Soy Source, which was doing a feature called “Otoko no ryouri,” or Men’s Cuisine, featuring four different Seattle-area men who cook, and who presumably have some sort of connection to Japan. Teruyo Koshimaya, an editor at the paper, and Hiro Yamada, a photographer and member of my Japanese speaking social group, dropped by for lunch about a week and a half ago, and I made a few dishes while we chatted about food, travel, ceramics, work and other things.

I served a potato-based focaccia topped with mizuna pesto (later used in this fettucini and morel dish), a simple blanched broccolini topped with hot browned shallots, garlic, and good balsamic vinegar, a marinated mushroom dish, and a cannelini-cheddar soup topped with fried gobo (burdock root). Nothing turned into a disaster, which is always the thing I worry about when I have unusual amounts of attention paid to my food…

Two recipes, which are probably approximations of what I made because I almost never work from exact recipes and I had to estimate quantities, were included here (in Japanese) as a sidebar to the article. I did try to measure things out somewhat carefully, so they shouldn’t be too far off.

It was a lot of fun. I look forward to someday being semi-famous again.

Pseudo-samosas with repurposed colcannon, and cranberry bean cakes with pear chutney

March 23, 2010, 11:19 PM

No matter how hard we try, the two of us cannot eat a large pot of what amounts to be little more than mashed potatoes, regardless how many greens are involved.

So I decided to repurpose the leftovers a little bit. I melted some butter in a 6” skillet and added a spice blend (Kashmiri garam masala, I think) and turmeric, then poured it over the remaining colcannon in the refrigerator. I also added some frozen peas.

Mini samosas, Night two

I improvised a dough by rubbing some of flour and salt with a bit of butter, then added just enough water to combine. I worked the dough together and let it rest for a while in the refrigerator.

Mini samosas, night one

I then rolled out the dough and cut it into small pieces, and Hiromi and I got to work stuffing them.

The first night I prepared them as just a little snack to go along with a couple of other dishes, but tonight I noticed I had some ungracefully aging pears in the refrigerator, and thought I should make quick use of them before something nefarious happened. I put together a simple chutney built on fenugreek, allspice, a little black pepper, and coriander, along with some fresh young ginger, onions, and a couple of fresh chilies, along with a bit of salt and unrefined sugar.

Pear chutney

A couple of nights ago, I prepared some cranberry beans with some Chinese spices like star anise and some large white seed I’ve never learned the name of, and some fennel seed. I thought I was going to use these as a little bean side dish that never quite happened. By the time I needed them again, I had a far different craving, so I mashed the beans with some egg, flour and breadcrumbs, and pan-browned them in a nonstick omelet pan with a little oil. (They could just as easily be deep fried).

Cranberry bean cakes

I was ever-so-slightly worried that the vaguely Chinese seasoning of the beans would fight with the vaguely Indian seasoning of the chutney, but actually they worked quite nicely together. The star anise and fennel added a nice depth to the bites of the cranberry bean cakes, and the chutney added a nice gently-fiery sweetness. We also found that the baby spinach underneath, motivated mostly by color, proved to be an useful utensil for carrying the bean cakes to our mouths, and added a little textural contrast.

Morels with homemade fettuccini

March 23, 2010, 12:00 PM

We self-indulgently bought a pasta roller last summer. It’s a single-purpose device, and I don’t have many items like that, at least not when they take up as much room as that, but pasta is a staple food for us and I wanted to have a tool that made it easier to produce pasta of a consistent thickness and texture.

I’m still not quite at the level where I’m going to beat anyone’s Italian nonna if we undertook some sort of pasta death match, but it’s surprising how little practice is required to develop perfectly respectable results.

First morels of the year, homemade fettucini, and mizuna pesto

One of the guys at Sosio’s happens to go to the same gym I do, and he’s there nearly every day. He noticed me fighting the dumbbells little over a week ago and told me I needed to come in and get some morels, which seem to have come in a bit early this year. So I went in on the weekend and grabbed some.

I thought it was a good excuse to break out the pasta maker. It’s really not too time-consuming to make a small amount of pasta, at least in the amount required to serve 2-4 people, so it’s even manageable on a weeknight. The only difficult thing is allowing the prepared dough to rest 30-60 minutes before attempting to roll it out. If you don’t do that, it fights with you, and you get these crazy holes inexplicable places. But once it’s reasonably well rested, the gluten in the semolina relaxes and the dough cooperates nicely. It just requires a little patience, and, when possible, another pair of helpful hands.

We had plenty of pesto I prepared for a lunch meeting on Sunday afternoon. The particular pesto I made was not prepared from the usual Genovese ingredient of basil, however. I turned to mizuna, a Japanese green with a flavor similar to, but slightly brighter than arugula. This is one of my favorite versions of pesto, and turns out to be ever so slightly cheaper than the basil version, since it comes in roughly one-pound bundles for $2.80 at Uwajimaya; I usually have to pay at least $4/pound for basil when I buy it in bulk, if not more, and it’s crazy expensive when purchased on those obnoxious $3 one-ounce plastic containers at the supermarket. So it not only makes a refreshing change of pace; it’s also surprisingly frugal.

I suppose that’s kind of moot after paying for morels, but they were surprisingly inexpensive for ones sold so early in the season. I’ve paid more in the peak of the harvest in past years, so we must have a particularly prolific crop in store.

Under the more relaxed conditions of weekend pasta-making, I like to let the rolled and cut pasta dry out a touch, maybe an hour or so, before I try to boil it, but for fettucini, it’s not really necessary. We once tried the spaghetti cutter on a weeknight and tried to serve that with a tomato sauce before letting it dry at all after cutting, and we produced something very similar to ramen-shop ramen instead of spaghetti. I might be wrong, but my limited experience seems to tell me that, when under time constraints, wider noodles like fettuccini or tagliatelle work better.

The morels were just cooked with a generous knob of butter and salt as the pasta cooked. I drained the pasta after cooking it for 2-3 minutes in salted water, leaving just a touch of water in the pan, and tossed the pasta, morels and mizuna pesto together until combined.

It’s best served hot, and pesto cools quickly, so get it right out there on the table and eat!

We had it with a nice serving of lentil soup, which was part of dinner a couple of times last week, and maybe a little salad.

There’s not much of a recipe, as it was really about having everything around when I needed it and adjusting seasoning as required, but the mizuna pesto goes a little something like this:

Mizuna pesto

Ingredients

  • 2/3 of a bundle of mizuna, about 300g (2/3 lb)
  • 2 cloves garlic
  • 2 tablespoons raw pine nuts
  • Good extra-virgin olive oil
  • 1/2 cup freshly grated parmesan cheese (about 50g)

Technique

  1. Toast pine nuts gently about 5-6 minutes on low heat in a pan. Set aside to cool.
  2. Wash mizuna. Remove sprout from garlic, if present, to avoid unwanted bitterness. Add mizuna to a blender with garlic, pine nuts, and a little olive oil. Pulse the blender with the "chop" mode (medium speed). Add additional olive oil through the lid opening until an emulsion forms. You should still see small pieces of mizuna, but all the leaves should be broken.
  3. Grate parmesan and stir into the pesto.

Okonomiyaki with gobo, okonomiyaki with pork

March 22, 2010, 10:16 PM

As a vegetarian, I don’t eat the most common variations of okonomiyaki, which involve pork or other animal bits.

I’m quite fine with the “modern yaki”, as one Tokyo restaurant called their wackier, contemporary spins on the dish; okonomiyaki is really a modern dish itself, and crazy variations are totally in keeping with the convention. One of the first two versions I ever tasted involved chunks of cheese mixed in the batter, and that suits me just fine. But one aspect I haven’t given serious thought to is a suitable replacement, either visually or in terms of flavor, for the katsuo-bushi, shaved dried skipjack tuna that is nearly always sprinkled on top.

Okonomiyaki with gobo, kizami ginger and cheese

Until now. I made fried shaved burdock root (gobo chips) for an unrelated purpose earlier in the day, and had some left over. Since we had a really heavy lunch at Lunchbox Laboratory earlier in the day, and some snacks for a photography gathering on Sunday, we decided to go with ostensibly lighter fare for dinner. Or rather, as light as a savory pancake covered with mayonnaise can be. Mine had an overdose of kizami-shouga (pickled matchstick cut ginger), because I can, and pieces of aged cheddar and gruyere inside.

I’ve certainly done other versions of this, but the gobo worked very well. Obviously the burdock is a lot earthier than katsuo and doesn’t have the same kind of aroma as the katsuo, but it’s sliced thin and adds a nice crisp texture that works really well. It’s also at least as visually interesting as the katsuobushi.

Pork loin okonomiyaki with katsuo-bushi

Hiromi had a pork craving, so we made a more conventional version for her. This one was basically chopped pieces of pork loin cooked with salt and pepper in the frying pan briefly before the cabbage mixture is added. It’s also made with the usual pickled ginger, but more importantly, this version has the standard katsuo-bushi topping (but Hiromi wanted some of the burdock too, because there’s nothing quite as dangerous as fried gobo).

Katsuobushi placed on top of hot okonomiyaki has one visual advantage, only recognizable with full-motion video or by sitting right there at the table when it’s served. The extreme thinness and large surface area plays with the heat from the pancake, and the dried fish writhes and dances around as the okonomiyaki cools.

Tagged

Stuffed red chard

March 22, 2010, 12:21 AM

We have a somewhat implicit bias favoring simple, seasonal food that requires minimal forethought, but generally I’m willing to do a bit more work to step up the drama.

Red chard

But it’s nice when it’s really just a little extra work.

Gefüllte Mangoldblätter, or stuffed Swiss chard, appearing in many German cookbooks when I lived there, but I’m pretty sure I never once made it myself in the entire time that I was in the country. It’s not so much that I was intimidated; I suppose i just didn’t see the point. Or maybe I just didn’t know what to do with the vegetable when I saw it.

Rolled chard

Hiromi has a strong affection for rolled cabbage, though, so it was inevitable that I’d eventually apply the same treatment to Swiss chard. Actually, we’ve probably done it before, but I can’t quite remember when, so I’m going to say it’s still new to us.

Hiromi trimmed the leaves and we blanched the chard briefly, giving it just about one minute in the boiling water before draining and transferring to a big bowl of ice water to stop the color change.

DSC_0462

I prepared a filling inspired loosely by Hiromi’s preferred style of ganmodoki, which has some black and white toasted sesame in it. I basically sauteed some nira (a sort of Asian chive commonly used in Japanese-style gyoza) and diced shiitake with a couple of serious spoons full of black and white sesame seeds, and. Once the mushrooms were suitably browned, I added this mixture to some crumbled medium-firm momen tofu and stirred everything together. Hiromi stuffed the leaves, and skewered them with short kushi, or kebab sticks, to hold them together.

The finished stuffed red chard

I made a simple vegetable stock just before we had gotten started on this, using a mirepoix as a foundation, so the last bit came together quickly. In a saucepan I lightly browned shallots and added stock, a little splash of wine, and salt and pepper and maybe a few other herbs.

Another angle of stuffed swiss chard

We then put the stuffed chard rolls into the saucepan just for a couple of minutes to let everything mingle together, and we served them.

The robustness of the chard turns out to help the rolls stay together; they were far less fragile than the cabbage variants we’ve made before. The sesame, shiitake, nira and fresh tofu in the filling removed most of the commonality with all but the most contemporary of German versions, but provided a great source of flavor, and was comforting for the Japanese half of the family. And the shallot-enhanced broth married the earthy chard together with the savory filling.

I’d say I prefer this version over the vegetarian cabbage rolls I’ve previously made, since the wrapping itself is a star player; cabbage tends to be much less assertively flavored, and probably wants even more powerfully seasoned fillings. I felt like I could have gotten away with a slightly milder filling compared to what we ended up with, but it turned out just about right.

Tagged
1 2